Basic Selectors
Three selectors have been around since the very beginning and are universal to all browsers that support CSS:
- Type
- Selects elements according to the element name.
- Class
- Selects elements according to the value of the
class attribute.
- Identity
- Selects an element (note the singular) according to the value of its
id attribute.
Type Selectors
A type selector selects elements according to their type—that is, their element name. For example, the type of element selected could be a third-level header; therefore the type would be h3. The desired effect: To display third-level headers by using a different font than what's used on the computer, centering the text and making it larger, and having a black solid line 1 pixel thick above and below the header. Here are the declarations:
- Set the font:
font-family:"Copperplate Gothic Light", serif; 1- Center the text:
text-align:center;- Make the text larger:
font-size:150%; 2- Put a black solid line 1 pixel thick above and below the header (aka: a border)
-
- Make the border a solid line:
border-style:solid;- Colour the border black:
border-color:black;- Make the border along the top 1 pixel thick:
border-top-width:1px;- Make the border along the bottom 1 pixel thick:
border-bottom-width:1px;- No border on the left side:
border-left:0;3- No border on the right side:
border-right:0;3
Notes:
- To use a specific font on your computer, it is wisest to put the font name in quotations so that the spaces in the font's name don't confuse the browser.
Serif
is simply a Plan B
for the browser in case the computer does not have Copperplate Gothic Light
installed. You may have as long a list of fonts as you like in this context.)
- This means
150% the size of the text in the parent element.
Be careful, or you may end up with some very large text indeed.
- When you're using
0
in the context of borders, it means that you don't want a border to appear at all. Therefore, you don't need to specify border-left-width, -color, or -style (same goes for the border on the right). More on this when I talk about borders in Borders, Padding, And Margins: The CSS Box Model.
This set of rules will therefore look like this:
{font-family:"Copperplate Gothic Light", serif; text-align:center; font-size:150%; border-style:solid; border-color:black; border-top-width:1px; border-bottom-width:1px; border-left:0; border-right:0;}
It is common practice to put multiple declarations on separate lines for the sake of readabilty:
{
font-family:"Copperplate Gothic Light", serif;
text-align:center;
font-size:150%;
border-style:solid;
border-color:black;
border-top-width:1px;
border-bottom-width:1px;
border-left:0;
border-right:0;
}
Now, to specify that you want this rule to apply to the h3 element, the selector should be h3. Do not use the <
or >
symbols, just the element name.
h3{
font-family:"Copperplate Gothic Light", serif;
text-align:center;
font-size:150%;
border-style:solid;
border-color:black;
border-top-width:1px;
border-bottom-width:1px;
border-left:0;
border-right:0;
}
And the results are:
Below is the code of the page in its entirety:
<!DOCTYPE html PUBLIC "-//W3C//DTD HTML 4.01//EN" "http://www.w3.org/TR/html4/strict.dtd">
<html>
<head>
<meta http-equiv="Content-Type" content="text/html; charset=utf-8">
<meta http-equiv="Content-Style-Type" content="text/css">
<title>Styled Third-Level Headers</title>
<style type="text/css">
h3{
font-family:"Copperplate Gothic Light", serif;
text-align:center;
font-size:150%;
border-style:solid;
border-color:black;
border-top-width:1px;
border-bottom-width:1px;
border-left:0;
border-right:0;
}
</style>
</head>
<body>
<h1>First-level header is ignored</h1>
<h2>So is the second-level header</h2>
<h3>Third-level header gets the fancy look</h3>
<h3>So does this one</h3>
<h4>Fourth-level header is ignored, too</h4>
<h3>But all third-level headers are affected by this rule</h3>
</body>
</html>
Now, wouldn't you agree that this is a lot better than h3 style="font-family:"Copperplate Gothic Light", serif; text-align:center; font-size:150%; border-style:solid; border-color:black; border-top-width:1px; border-bottom-width:1px; border-left:0; border-right:0;"
repeated every time you wanted a third-level header?
Class Selectors
The class selector takes focus off the element name and concentrates on what group the element is a part of, which is defined by the class attribute. The selector in this case consists of a period followed by the class name.
So say we have two classes that describe how loudly someone is speaking. The classes are:
The contents of an element with the "whisper" class is to be in small text, while the contents of an element with the "yell" class should be large. Therefore, we set up the classes like this:
.whisper{font-size:80%;}
.yell{font-size:110%;}
In this case, I have the entire rule on one line since it saves space without sacrificing readability.
The code of the page looks like this:
<!DOCTYPE html PUBLIC "-//W3C//DTD HTML 4.01//EN" "http://www.w3.org/TR/html4/strict.dtd">
<html>
<head>
<meta http-equiv="Content-Type" content="text/html; charset=utf-8">
<meta http-equiv="Content-Style-Type" content="text/css">
<title>Whisper and Yell Classes</title>
<style type="text/css">
.whisper{font-size:80%;}
.yell{font-size:110%;}
</style>
</head>
<body>
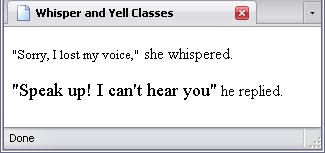
<p><big class="whisper">"Sorry, I lost my voice,"</big> she whispered.</p>
<p><small class="yell">"Speak up! I can't hear you"</small> he replied.</p>
</body>
</html>
Now, it would have been more semantic to use a q element or at least a span element, but I wanted to make a point about presentational markup. Look closely:
<p><big class="whisper">"Sorry, I lost my voice,"</big> she whispered.</p>
<p><small class="yell">"Speak up! I can't hear you"</small> he replied.</p>
By giving the big element the whisper class and the small element the yell class, their effects are completely reversed—which nullifies any use they might have.
Another example would be found in the code I used to describe the div element back in Block Elements. Here is the original code:
<!DOCTYPE html PUBLIC "-//W3C//DTD HTML 4.01//EN" "http://www.w3.org/TR/html4/strict.dtd">
<html>
<head>
<meta http-equiv="Content-Type" content="text/html; charset=utf-8">
<title>Example "div" Elements</title>
</head>
<body>
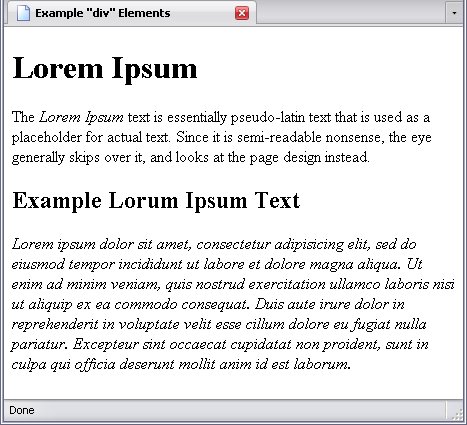
<div id="Lorem_Ipsum">
<h1>Lorem Ipsum</h1>
<p>The <span class="foreign" style="font-style:italic;">Lorem Ipsum</span> text is essentially pseudo-latin text that is used as a placeholder for actual text. Since it is semi-readable nonsense, the eye generally skips over it, and looks at the page design instead.</p>
<div id="Lorem_Ipsum-Example">
<h2>Example Lorum Ipsum Text</h2>
<p>Lorem ipsum dolor sit amet, consectetur adipisicing elit, sed do eiusmod tempor incididunt ut labore et dolore magna aliqua. Ut enim ad minim veniam, quis nostrud exercitation ullamco laboris nisi ut aliquip ex ea commodo consequat. Duis aute irure dolor in reprehenderit in voluptate velit esse cillum dolore eu fugiat nulla pariatur. Excepteur sint occaecat cupidatat non proident, sunt in culpa qui officia deserunt mollit anim id est laborum.</p>
</div>
</div>
</body>
</html>
Here, I can put the foreign
class to work by deciding that all elements with the foreign
class are in italics, allowing me to remove the style attribute (which cuts down on code).
.foreign{font-style:italic;}
. . .
<span class="foreign">Lorem Ipsum</span>
I also want the paragraph that holds the Lorem Ipsum
text to be in italics for the same reason, so I add the foreign
class to that paragraph as well. Note that I'm not adding this class to the paragraph containing the Lorem Ipsum
text because I want it in italics; I want the Lorem Ipsum
text in italics because the text is not in English, which gives the foreign class semantic meaning to go with its effect.
<!DOCTYPE html PUBLIC "-//W3C//DTD HTML 4.01//EN" "http://www.w3.org/TR/html4/strict.dtd">
<html>
<head>
<meta http-equiv="Content-Type" content="text/html; charset=utf-8">
<meta http-equiv="Content-Style-Type" content="text/css">
<title>Example "div" Elements</title>
<style type="text/css">
.foreign{font-style:italics;}
</style>
</head>
<body>
<div id="Lorem_Ipsum">
<h1>Lorem Ipsum</h1>
<p>The <span class="foreign">Lorem Ipsum</span> text is essentially pseudo-latin text that is used as a placeholder for actual text. Since it is semi-readable nonsense, the eye generally skips over it, and looks at the page design instead.</p>
<div id="Lorem_Ipsum-Example">
<h2>Example Lorum Ipsum Text</h2>
<p class="foreign">Lorem ipsum dolor sit amet, consectetur adipisicing elit, sed do eiusmod tempor incididunt ut labore et dolore magna aliqua. Ut enim ad minim veniam, quis nostrud exercitation ullamco laboris nisi ut aliquip ex ea commodo consequat. Duis aute irure dolor in reprehenderit in voluptate velit esse cillum dolore eu fugiat nulla pariatur. Excepteur sint occaecat cupidatat non proident, sunt in culpa qui officia deserunt mollit anim id est laborum.</p>
</div>
</div>
</body>
</html>
And here is the result:
Identity Selectors
This is the most specific selector of all—it specifies one and only one element, using that element's identity. Just to remind you, in (X)HTML, an element's identity is specified in its id attribute. This type of selector is usually used for layouts, selecting elements that are given highly specialized roles.
While class-based selectors are preceded by a period, identity-based selectors are preceded by a hash mark (#
).
In this case, I'm going to use an example from Block Elements, in which I demonstrated div elements.
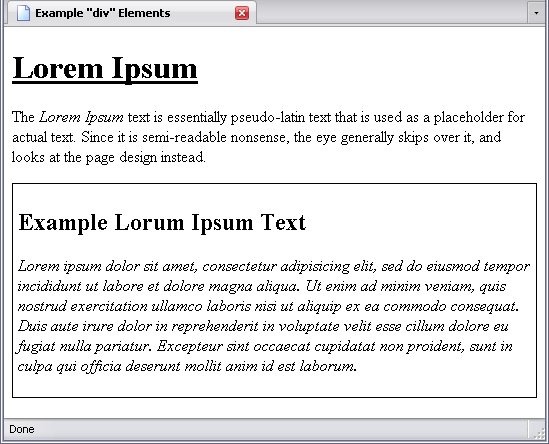
Around the div element with the identity Lorem_Ipsum_Example
, I want to put a 1-pixel solid black border. Therefore, I add the following rule:
#Lorem_Ipsum_Example{
border-color:black;
border-style:solid;
border-width:1px;
padding:5px;
}
I don't need to specify top
, bottom
, left
or right
since this border will go all the way around. The padding
property creates space between the border and the content.
For good measure, let's round off this demonstration of basic selectors by saying that the text of the h1 element should be underlined and that anything with the foreign
class be in italics.
h1{text-decoration:underline;}
The final code for all of this is:
<!DOCTYPE html PUBLIC "-//W3C//DTD HTML 4.01//EN" "http://www.w3.org/TR/html4/strict.dtd">
<html>
<head>
<meta http-equiv="Content-Type" content="text/html; charset=utf-8">
<meta http-equiv="Content-Style-Type" content="text/css">
<title>Example "div" Elements</title>
<style type="text/css">
h1{text-decoration:underline;}
.foreign{font-style:italics;}
#Lorem_Ipsum_Example{
border-color:black;
border-style:solid;
border-width:1px;
padding:5px;
}
</style>
</head>
<body>
<div id="Lorem_Ipsum">
<h1>Lorem Ipsum</h1>
<p>The <span class="foreign">Lorem Ipsum</span> text is essentially pseudo-latin text that is used as a placeholder for actual text. Since it is semi-readable nonsense, the eye generally skips over it, and looks at the page design instead.</p>
<div id="Lorem_Ipsum-Example">
<h2>Example Lorum Ipsum Text</h2>
<p class="foreign">Lorem ipsum dolor sit amet, consectetur adipisicing elit, sed do eiusmod tempor incididunt ut labore et dolore magna aliqua. Ut enim ad minim veniam, quis nostrud exercitation ullamco laboris nisi ut aliquip ex ea commodo consequat. Duis aute irure dolor in reprehenderit in voluptate velit esse cillum dolore eu fugiat nulla pariatur. Excepteur sint occaecat cupidatat non proident, sunt in culpa qui officia deserunt mollit anim id est laborum.</p>
</div>
</div>
</body>
</html>
Other Selectors
The type, class, and identity selectors will do a lot for you, but the last two require you to use those attributes and the first might be a bit broad. In CSS 2, 4 new types of selectors were added.
- Universal
- Selects all elements.
- Attribute
- Selects elements according to the presence of the specified attribute and optionally its value.
- Pseudo-class
- Selects elements and other content according to circumstances usually outside the (X)HTML document itself. I'll explain that when I get to it.
- Pseudo-element
- Selects elements that don't exist. I'll explain that when I get to it.
Some pseudo-classes and pseudo-elements were introduced in CSS 1, but they really didn't become popular until CSS 2
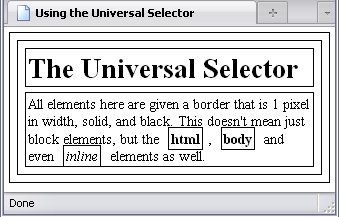
The Universal Selector
The universal selector selects everything, and its symbol is *
. It's not commonly used, but if you want every single element to have a black, solid border one pixel in width all the way around, this would be the selector to use.
*{
border-width:1px;
border-style:solid;
border-color:black;
padding:2px;
margin:5px;
}
Behold the result:
This has the bonus of being a very nice demonstration of nesting.
Type, class, and id selectors are far and away the most common selectors, and the universal selector gets quite a bit of use as well. You can create quite a good style sheet using just these. But the following selectors, although they are less common, may suit your purposes well. But be warned: they aren't supported by all browsers.
Attribute Selectors
Other attributes can be specified in selectors but rarely are for one major reason: Internet Explorer has a long history of getting its knickers in a twist over a lot of things and this type of selector is one of them. To put it shortly, while Firefox, Opera, Safari, and other browsers have supported such methods for years, it wasn't until Internet Explorer 7 (released in 2006) that Internet Explorer supported this as well. Considering earlier versions of Internet Explorer are reasonably popular (nearly 20% of all people who use a browser use IE4 - 6), it is still likely that someone will be using one of those browsers, and therefore won't be able to properly view a page styled using these selectors.
The syntax for attribute selectors is a little more complex than what we've seen so far. To begin with, an attribute selector be contained within square brackets, like this:
This is important. If you, say, want to select all elements with a title attribute, but forgot the brackets, the browser would instead select the title element. There's not much you can do with a title element, but that's what the browser would select. On the other hand, if you intended to select an h3 element, but had h3 inside square brackets, it would look for elements with an h3 attribute—an attribute that does not exist in (X)HTML.
Selecting By Attribute Presence
It is possible to select elements by the mere presence of a specific attribute.
In the following example, all quotes with a lang attribute are in italics:
<!DOCTYPE html PUBLIC "-//W3C//DTD HTML 4.01//EN" "http://www.w3.org/TR/html4/strict.dtd">
<html>
<head>
<meta http-equiv="Content-Type" content="text/html; charset=utf-8">
<meta http-equiv="Content-Style-Type" content="text/css">
<title>Using the Language Attribute</title>
<style type="text/css">
[lang]{font-style:italic;}
</style>
</head>
<body>
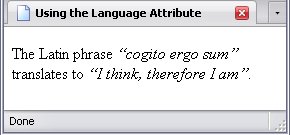
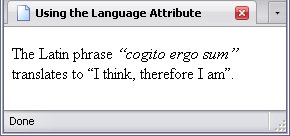
<p>The Latin phrase <q lang="la">cogito ergo sum</q> translates to <q lang="en">I think, therefore I am</q>.</p>
</body>
</html>
Thus, all elements with a lang attribute will be in italics. It is total coincidence that in this case, both such elements are q elements.
Selecting By Attribute Value
What if I don't want English phrases to be in italics, because English is not (to me) a foreign language? In other words, I want all elements with a lang attribute to be in italics, except when that attribute specifies English as the language. I can, in this case, make an exception for all attributes with the exact value of en
, which is the code for English.
As before, the selector is contained within square brackets ([ ]
). And, as before, you use the attribute name (in this case, lang). However, you would follow lang with an equal sign and the value of the attribute in quotations. Below is the selector in its entirety (the part that specifies the value en
is highlighted):
Since this is intended to be an exception to the rule, it would follow the more general rule pertaining to all elements containing a lang attribute.
<!DOCTYPE html PUBLIC "-//W3C//DTD HTML 4.01//EN" "http://www.w3.org/TR/html4/strict.dtd">
<html>
<head>
<meta http-equiv="Content-Type" content="text/html; charset=utf-8">
<meta http-equiv="Content-Style-Type" content="text/css">
<title>Using the Language Attribute</title>
<style type="text/css">
[lang]{font-style:italic;}
[lang="en"]{font-style:normal;}
</style>
</head>
<body>
<p>The Latin phrase <q lang="la">cogito ergo sum</q> translates to <q lang="en">I think, therefore I am</q>.</p>
</body>
</html>
This means that every element that has a lang attribute with the exact value of en
will be displayed normally.
Variations
There are variations of this, all depending on what symbol accompanies the equal sign. The first three were introduced in CSS 2, the rest in CSS 3.
- =
-
Example: [lang="en"]
The lang attribute has a value of exactly en
.
- |=
-
Example: [lang|="en"]
The value en
begins a hyphen-separated list of values or is on its own. This allows for values of en-CA
, en-UK
, or en-US
(Canadian, British, or American English, respectively) as well as en
alone.
- ~=
-
Example: [lang~="en"]
The value en
is one of a space-separated list of values (for example, lang="fr en de") or is on its own. This selector works a lot like the class selector (and indeed, class selectors could be written this way), but this is universal to all attributes. On the downside, this is not universal all browsers.
- ^=
-
Example: [lang^="en"]
The lang attribute begins with the text en
. This selector would match something like lang="english", but not lang="fr en de".
- $=
-
Example: [lang$="ca"]
The href attribute ends with the text ca
. For example, it would match lang="en-ca" but not lang="en-ca en-uk" .
- *=
-
Example: [lang*="en-ca"]
The href attribute has the text en-ca
somewhere in it. This would match lang="en=uk en-ca en-bb"
Pseudo-Classes
Pseudo-classes select elements according to characteristics that are not specified in their attributes, element name, or their ancestor elements (I'll get to that last bit later on in the chapter). The three exceptions are marked with asterisks. Pseudoclass names are preceded by a colon (:
). The pseudo-classes are:
- CSS 1
- CSS 2.1
- :first-child
- :lang()*
- :focus
- :hover
- CSS 3
- :root*
- :nth-child()
- :only-child
- :nth-last-child()
- :last-child
- :first-of-type
- :nth-of-type()
- :only-of-type
- :nth-last-of-type()
- :last-of-type
- :empty
- :target
- :enabled
- :disabled
- :checked
- :not()*
CSS 3 was made a recommendation only in 2011, so not all browsers will support it.
Hyperlink Pseudo-Classes
There are two pseudo-classes that are exclusively for hyperlinks: :link and :visited. Along with active are the oldest pseudo-classes, debuting in CSS 1. These two pseudo-classes allow you to control the appearance of hyperlinks, both unclicked (through :link) and clicked (through :visited).
I give these rather short shrift because, if you've been to any websites where links are different colours depending on whether or not you've been to the pages they point to, you know the effects already. I will, however, make a note on the order these pseudoclasses should be in for them to have the proper effect:
- :link
- :visited
- :active*
- :hover*
*I cover this in Dynamic Pseudo-Classes
below.
Dynamic Pseudo-Classes
The dynamic pseudo-classes allow for some interaction with the webpages beyond simply clicking on links.
Again, I'm giving these short shrift because you already have an idea of how pseudo-classes work.
- Introduced in CSS 1
- :active
- This is usually used with hyperlinks, but could be used with any element. An element is
active
between the time you press down the mouse button while the mouse cursor is over that element and the time you release the mouse button—in other words, when you are actually clicking on the element.
- Introduced in CSS 2
- :focus
- This one is usually used for form elements—and I haven't explained those yet because forms are absolutely useless without scripting, which lets you interact with the page (and is also the hairiest hocus-pocus website creation has to offer); that's why Forms is in the JavaScript section, not the (X)HTML section. Suffice to say for now,
:focus means is that the form element has been selected to accept input.
- :hover
- Have you ever seen pages where you move the mouse cursor over an element (usually an
a element) and the colour or something like that changes? This is the pseudo-class that allows you to do that.
- Introduced in CSS 3
-
The pseudo-classes introduced in CSS 3 are for the form interface elements: input, button, select and textarea. I describe these in greater detail in Forms
- :enabled
- :disabled
- These refer to whether an interface element may be used (
:enabled) or not (:disabled).
- :checked
- This is for interface elements that are configured as checkboxes or radio buttons. Again, I'll explain what that means in Forms.
The Child Pseudoclasses
These pseudoclasses select elements according to which child of the parent element they are. There are ten such selectors and two that fit the group in other ways. They are:
- :root
- :first-child
- :nth-child()
- :only-child
- :nth-last-child()
- :last-child
- :first-of-type
- :nth-of-type()
- :only-of-type
- :nth-last-of-type()
- :last-of-type
- :empty
The :first-child pseudoclass, the oldest (introduced in CSS 2) and thus most common child pseudoclass, applies to any element that is the first child element of its parent element. Used alone like this, it will first apply to the first child of the body element, then the first child element of every element within the body, their first child elements, and so on. This will apply to neither the body nor html element. The body element is not the first child of the html element (that's head, which does not appear on the webpage and thus gets no styling) and the html element (the root element) is not a child element at all.
Below is the code of a page that puts a border around every element that is the first child of another element.
First Child Elements In Bold
First Child Elements Of First Child Elements Underlined
<!DOCTYPE html PUBLIC "-//W3C//DTD HTML 4.01//EN" "http://www.w3.org/TR/html4/strict.dtd">
<html>
<head>
<meta http-equiv="Content-Type" content="text/html; charset=utf-8">
<meta http-equiv="Content-Style-Type" content="text/css">
<title>Demonstrating :first-child</title>
<style type="text/css">
:first-child{
border-width:1px;
border-style:solid;
border-color:black;
padding:2px;
margin:5px;
</style>
</head>
<body>
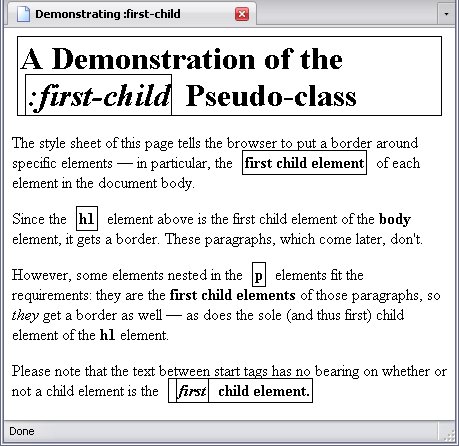
<h1>A Demonstration of the <em>:first-child</em> Pseudo-class</h1>
<p>The style sheet of this page tells the browser to put a border around specific elements — in particular, the <strong>first child element</strong> of each element in the document body.</p>
<p>Since the <strong>h1</strong> element above is the first child element of the <strong>body</strong> element, it gets a border. These paragraphs, which come later, don't.</p>
<p>However, some elements nested in the <strong>p</strong> elements fit the requirements: they are the <strong>first child elements</strong> of those paragraphs, so <em>they</em> get a border as well — as does the sole (and thus first) child element of the <strong>h1</strong> element.</p>
<p>Please note that the text between start tags has no bearing on whether or not a child element is the <strong><em>first</em> child element.</strong></p>
</body>
</html>
The result is:
The rest were introduced in CSS 3, and are not supported by a majority of browsers yet. Use of them may result in browser misinterpretations resulting in strange styling behavior (:only-child, I am looking at you).
- :root
- This isn't really a child pseudoclass and isn't much use in (X)HTML, as the root element is either unstyled, or referred to by name since it's always the
html element. With other XML languages, however, this may come in useful if it's not clear what the root element might be.
- :only-child
- This one refers to an element that is the only child of its parent element.
- :last-child
- This selects the last child element of a parent element.
- :first-of-type
- :only-of-type
- :last-of-type
- These work much like the
:first-child, :only-child and :last-child pseudoclasses, but they select elements of a specific type—for example, if one used p:first-of-type, it would select the first p element, regardless of whether any other elements preceded it.
- :empty
- This isn't really a child pseudoclass either. Instead, it refers to elements that have no content whatsoëver, not even text.
The rest I explain below.
The Nth-Child Pseudo-Classes
Four child-pseudoclasses allow you to select either a child other than the first or last of the parent element, or select elements in a pattern. These are:
- :nth-child()
- :nth-last-child()
- :nth-of-type()
- :nth-last-of-type()
What goes between the parentheses is either a number (to choose a specific child element) or a mathematical equation. The number is simple— 1
would select the first child element, the first child of its type, the last child, or the last of its type, depending on which of these pseudoclasses you used—in other words, they would be the equivalent of first-child, first-of-type, last-child, and last-of-type respectively. If you used the number 2
, it would get the second child element, the second of its type, the second-to-last element or the next-to-last of its type—assuming that those elements were there, of course.
An equation is a bit more complex: it takes the form of an±b. In that equation, n
must remain n
, otherwise the equation won't work (I checked). Therefore, the two real variables here are a and b.
In the equation, a multiplies n. If a = 2, then every second child element (or child of its type) will be selected. If a = 3, then every third will be selected. If a = 1, you may as well omit a.
The variable b is added to or subtracted from an. If a = 1 (or is absent, which amounts to the same thing), b will have no effect if it is subtracted or adds only 1 to n (of course, if b = 0, it won't have any effect at all). If it adds two to an, then the first, first of its type, last, or last of its type (depending on which pseudo-class you're using) will be skipped; if b = 3, then the two first or two last will be skipped, and so on. The other way b can be used with an is to use the equation to set up a pattern: a to set the pattern's length (say every eight elements), b to decide where in that pattern a rule applies.
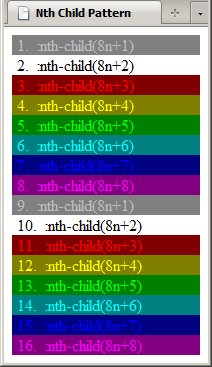
Below is a stylesheet using such selectors and a list that it styles.
:nth-child(8n+1){color:silver; background:grey;}
:nth-child(8n+2){color:black; background:white;}
:nth-child(8n+3){color:red; background:maroon;}
:nth-child(8n+4){color:yellow; background:olive;}
:nth-child(8n+5){color:lime; background:green;}
:nth-child(8n+6){color:aqua; background:teal;}
:nth-child(8n+7){color:blue; background:navy;}
:nth-child(8n+8){color:fuchsia; background:purple;}
<ul>
<li>:nth-child(8n+1)</li>
<li>:nth-child(8n+2)</li>
<li>:nth-child(8n+3)</li>
<li>:nth-child(8n+4)</li>
<li>:nth-child(8n+5)</li>
<li>:nth-child(8n+6)</li>
<li>:nth-child(8n+7)</li>
<li>:nth-child(8n+8)</li>
<li>:nth-child(8n+1)</li>
<li>:nth-child(8n+2)</li>
<li>:nth-child(8n+3)</li>
<li>:nth-child(8n+4)</li>
<li>:nth-child(8n+5)</li>
<li>:nth-child(8n+6)</li>
<li>:nth-child(8n+7)</li>
<li>:nth-child(8n+8)</li>
</ul>
The rather colourful result:
And yes, :nth-child(8n+2) does indeed apply to the body element as well; being the second child element of the html element, it gets a white background and black text. I deliberately arranged the pattern that way to keep the page from looking hideous.
Olive background. Ick.
:lang()
This is the only pseudo-class that's actually based on an attribute—specifically, the lang attribute. This works much like the selector [lang] and its variants, but also selects the child elements of a the matching element as well.
This pseudo-class is a bit more complicated because it takes the following form:
X
must not be blank; it must have a value—even if it is not a legitimate language code.
In the example below, I fiddled with the Lorem Ipsum
page to illustrate this. Since the text is not in any actual language, I used the fake language code x-Lorem
(x-
means an experimental language).
So behold the code (CSS rule highlighted and langage attributes highlighted):
<!DOCTYPE html PUBLIC "-//W3C//DTD HTML 4.01//EN" "http://www.w3.org/TR/html4/strict.dtd">
<html>
<head>
<meta http-equiv="Content-Type" content="text/html; charset=utf-8">
<meta http-equiv="Content-Style-Type" content="text/css">
<title>Lang Pseudo-Class</title>
<style type="text/css">
:lang(x-Lorem){
border-color:black;
border-style:solid;
border-width:1px;
padding:5px;
}
</style>
</head>
<body>
<div id="Lorem_Ipsum">
<h1>The Lorem Ipsum Text</h1>
<p>The <span lang="x-Lorem">Lorem Ipsum</span> text is essentially pseudo-latin text that is used as a placeholder for actual text. Since it is semi-readable nonsense, the eye generally skips over it, and looks at the page design instead.</p>
<div id="Lorem_Ipsum_Example" lang="x-Lorem">
<h2>Lorum Ipsum</h2>
<p class="foreign">Lorem ipsum dolor sit amet, consectetur adipisicing elit, sed do eiusmod tempor incididunt ut labore et dolore magna aliqua. Ut enim ad minim veniam, quis nostrud exercitation ullamco laboris nisi ut aliquip ex ea commodo consequat. Duis aute irure dolor in reprehenderit in voluptate velit esse cillum dolore eu fugiat nulla pariatur. Excepteur sint occaecat cupidatat non proident, sunt in culpa qui officia deserunt mollit anim id est laborum.</p>
</div>
</div>
</body>
</html>
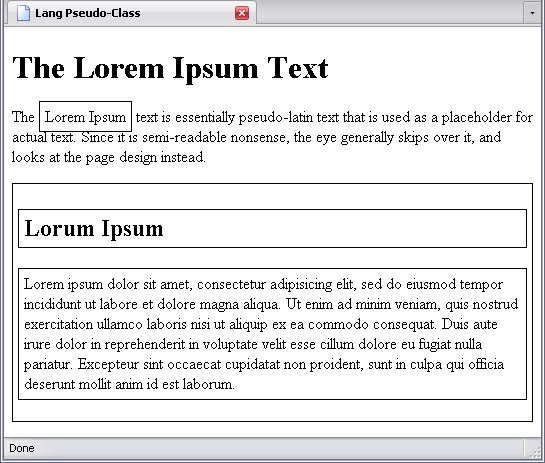
Note that not only does the div element with the lang attribute get a border, but also its child elements, since they are assumed by the rule (and thus the browser) to be in the Lorem
language. That is the difference between [lang|="X"] and :lang(X)—the former would put a border around the div element and ignore its children.
:not()
Before CSS 3, if we needed to exclude certain elements based on their attributes, names, etc., we would have to write a general rule including all elements based on its class, identity, attribute or name, then a more specific one based on whatever the element was/wasn't supposed to have. For example, if I wanted to select turn all p elements without the attribute class attribute red, I would have to turn all p elements red, then code the exceptions. It was a very simple process—
Okay, I understand that usage of not
is almost 20 years old, but it seemed appropriate here.
This pseudoclass works on negation; it selects elements that don't have whatever is specified between the parentheses. Below is the selector that selects all elements that don't have the class attribute:
Since this was introduced in CSS 3, all browsers, even text-only browsers, support this pseudoclass—not.
Pseudo-Elements
While pseudo-classes control elements according to characteristics other than attributes, type, and ancestry, pseudo-elements tell a browser to select elements that don't exist—basically, they're added in by the stylesheet. The pseudo-elements are:
- :first-line
- :first-letter
- :before
- :after
Two things to remember: First, these not universal to all modern browsers. Second, CSS 2 requires that the pseudo-element names be preceded with a single colon (:
), CSS 3 says they should be preceded by a double colon (::
). Browsers are more likely to support the single colon.
:first-line and :first-letter
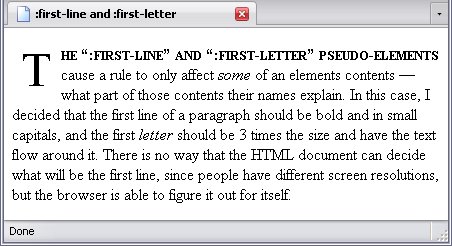
It is impossible to use (X)HTML to specify the first line of a paragraph. People may use different screen resolutions or may not even have their browser maximized. However, sometimes you do want to bring attention to the first line. That is what the first-line pseudo-element is for. This rule depends entirely on the browser knowing where the first line ends.
The :first-letter selects only the first letter in an element, allowing further styling of one's text. While you can specify the first letter using (X)HTML, this rule saves you some coding.
Below is a webpage that uses both pseudo-elements in its style sheet.
<!DOCTYPE html PUBLIC "-//W3C//DTD HTML 4.01//EN" "http://www.w3.org/TR/html4/strict.dtd">
<html>
<head>
<meta http-equiv="Content-Type" content="text/html; charset=utf-8">
<meta http-equiv="Content-Style-Type" content="text/css">
<title>:first-line and :first-letter</title>
<style type="text/css">
:first-line{
font-weight:bold;
font-variant:small-caps;
}
:first-letter{
font-size:3em;
display:block;
float:left;
margin:10px;
}
</style>
</head>
<body>
<p>The <q>:first-line</q> and <q>:first-letter</q> pseudo-elements cause a rule to only affect <em>some</em> of an elements contents—what part of those contents their names explain. In this case, I decided that the first line of a paragraph should be bold and in small capitals, and the first <em>letter</em> should be 3 times the size and have the text flow around it. There is no way that the HTML document can decide what will be the first line, since people have different screen resolutions, but the browser is able to figure it out for itself.</p>
</div>
</body>
</html>
Below is the result:
:before and :after
These two pseudo-elements are used to put little something extra on either side of an element (which side is described by the pseudo-element).
Below is a page that uses both rules:
<!DOCTYPE html PUBLIC "-//W3C//DTD HTML 4.01//EN" "http://www.w3.org/TR/html4/strict.dtd">
<html>
<head>
<meta http-equiv="Content-Type" content="text/html; charset=utf-8">
<meta http-equiv="Content-Style-Type" content="text/css">
<title>:before and :after</title>
<style type="text/css">
:before{content:"(";}
:after{content:")";}
</style>
</head>
<body>
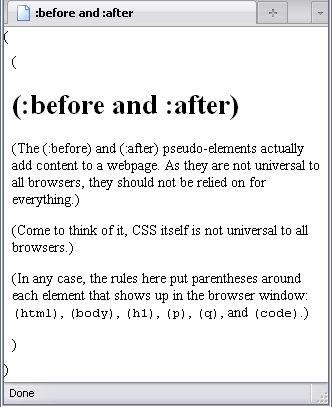
<h1>:before and :after</h1>
<p>The <q>:before</q> and <q>:after</q> pseudo-elements actually add content to a webpage. As they are not universal to all browsers, they should not be relied on for everything.</p>
<p>Come to think of it, CSS itself is not universal to all browsers.</p>
<p>In any case, the rules here put parentheses around each element that shows up in the browser window: <code>html</code>, <code>body</code>, <code>h1</code>, <code>p</code>, <code>q</code>, and <code>code</code>.</p>
</div>
</body>
</html>
Compound Selectors
When you want to select paragraphs, the selector reads p. When you want to select elements of the foreign
class, the selector reads .foreign.
But what if you want to select paragraphs of the foreign class?
To understand this next part, you have to understand that every class selector, to the browser, looks like this:
Remember the universal selector from earlier? When on its own, it selects everything, but now it selects everything with the foreign
class. Notice there is no space between *
and .foreign
(this is important).
To specify a specific type of element, replace * with the element name you want. What this means is that the element must match in both name and class to be selected by the rule.
Do note: The element name must always come first. That is how CSS works; it selects elements by element type first, then narrows down the selection by attributes and their values. The attributes, IDs, classes, and pseudo-classes may be in any order, but pseudo-elements must come at the end.
Below, I will demonstrate several combinations that can be made by this means:
- Element must belong to classes
class1
and class2
-
- Selector:
.class1.class2- Will be selected:
-
- p class="class1 class2"
- p class="class2 class1"
- p class="class1 class2 class3"
- Will not be selected:
-
- p class="class1"
- p class="class2"
Do note that some browsers will be confused by selectors that use multiple classes like this, though, and will only select according to the last class listed.
- Element must be of type
p and belong to class class1
-
- Selector:
p.class1- Will be selected:
-
- p class="class1"
- p class="class1 class2"
- Will not be selected:
-
- div class="class1"
- p class="class2"
- p
- Element must be of type
ul and have the ID Navigation
-
- Selector:
ul#Navigation- Will be selected:
-
- ul id="Navigation"
- ul class="class1" id="Navigation"
- Will not be selected:
-
This may seem a little redundant; after all, there can be only one element within an (X)HTML document with the ID Navigation
. And, if used in an internal stylesheet, specifying the element type would indeed be redundant. But recall that the ID Navigation
must be unique within the document, not within the website, and an external sheet can affect an infinite number of pages—and there could be as many elements with the ID Navigation
as there are pages. Some of these elements might be of the element type ul (in which case the rule would apply), some might of another type (and would therefore be excluded).
- Element must be of type
q, have the class whisper
, and a lang attribute
-
- Selector:
q.whisper[lang]- Will be selected:
-
- q class="whisper" lang="en"
- q class="whisper class1" lang="en"
- Will not be selected:
-
- q class="whisper"
- q lang="en"
- span class="whisper" lang="en"
- Element must have a
lang attribute and may be of any language except English
-
- Selector:
*.[lang]:not([lang|="en"])- Will be selected:
-
- span lang="fr"
- q lang="de"
- Will not be selected:
-
- q lang="en"
- span lang="en-CA"
These are just some of the combinations you can use to refine which elements are selected. There are only two combinations that you may not use: A combination of ID and ID and a combination of type and type. This is offset by the fact that each element may have only one ID and one type.
Selecting According To Nesting
Selectors can be made more exclusive by specifying not just element, class, ID, attribute, or so on, but also specifying your desired elements' ancestors, parents, and siblings. In all cases of the following selectors, the last selector in the sequence is the subject of the rule.
Ancestor/Descendant
For example, a selector could specify span elements that are descendants of h2 elements. Below is the selector:
The selector first specifies h2 elements, then tells the browser to look for a span element within any h2 elements. It's important when using these selectors to name the elements from the outside in. The following selector is technically valid CSS, but is unlikely to select anything in a valid (X)HTML document.
If the above selector does match something, it means you've nested an h2 element within a span element, which you're not supposed to do, or you're abusing the del and/or ins elements.
It's important to remember that this selector specifies the descendant element, not the child element. This selector will match all span elements nested within an h2 element, no matter what else they are nested in or how many layers of nesting there are.
This is universal to all browsers.
Parent/Child
What if you wanted to specify only span elements that had not just h2 ancestors, but h2 parents? A special symbol comes into play: >
.
As before, the selector first specifies h2 elements, then tells the browser to look for a span element within any h2 elements—but this time, only to look as far as the children of the h2 elements. Grandchildren and so on are ignored.
This is not universal to all browsers.
By Preceding Sibling
This selector selects elements that follow other elements. The sign to signify this is +
. For example, if you wanted to target a paragraph that immediately followed a sixth-level header, the selector would be
In this case, the browser look for an h6 element and then looks for a following p element. Text between the two elements is not taken into account. However, if there is, say, a div element between an h6 element and the next p element, the rule would not come into effect.
CSS 3 introduced the ability to select an element by a preceding sibling that was not adjacent. The symbol for this is ~
.
In this case, if there was a div element between an h6 element and the next p element, the rule would come into effect.
These are not universal to all browsers.
Mixing The Above
Below is a demonstration of how the above selectors work. Each instance of the words "span element" (or the plural thereof) is in a span element.
<!DOCTYPE html PUBLIC "-//W3C//DTD HTML 4.01//EN" "http://www.w3.org/TR/html4/strict.dtd">
<html>
<head>
<meta http-equiv="Content-Type" content="text/html; charset=utf-8">
<meta http-equiv="Content-Style-Type" content="text/css">
<title>Selecting By Nesting</title>
<style type="text/css">
span{color:red;}
div span{color:blue;}
div > span{color:green;}
span + span{color:olive;}
</style>
</head>
<body>
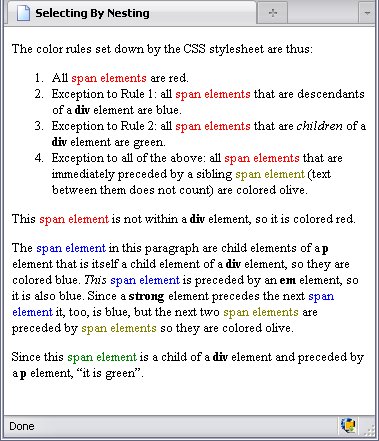
<p>The color rules set down by the stylesheet are thus:</p>
<ol>
<li>All <span>span elements</span> are red.</li>
<li>Exception to Rule 1: all <span>span elements</span> that are descendants of a <strong>div</strong> element are blue.</li>
<li>Exception to Rule 2: all <span>span elements</span> that are <em>children</em> of a <strong>div</strong> element are green.</li>
<li>Exception to all of the above: all <span>span elements</span> that are immediately preceded by a sibling <span>span element</span> (text between them does not count) are colored olive.</li>
</ol>
<p>This <span>span element</span> is not within a <strong>div</strong> element, so it is colored red.</p>
<div>
<p>The <span>span element</span> in this paragraph are child elements of a <strong>p</strong> element that is itself a child element of a <strong>div</strong> element, so they are colored blue. <em>This</em> <span>span element</span> is preceded by an <strong>em</strong> element, so it is also blue. Since a <strong>strong</strong> element precedes the next <span>span element</span> it, too, is blue, but the next two <span>span elements</span> are preceded by <span>span elements</span> so they are colored olive.</p>
Since this <span>span element</span> is a child of a <strong>div</strong> element and preceded by a <strong>p</strong> element, <q>it is green.</q>
</div>
</body>
</html>
Pictured below is the result:
Other Examples
The example back in Block Elements, which showed p elements nested within del and ins elements can be simplified by these simple rules:
del p{line-decoration:line-through;}
ins p{line-decoration:underline;}
What this means is every p element that is a descendant of a del element gets a line through its text, and any p element that is a descendant of an ins element is underlined.
It also means you can get rid of the style attributes used in the p elements:
<style type="text/css">
del p{line-decoration:line-through;}
ins p{line-decoration:underline;}
</style>
. . .
<del cite="G. W. Bush is no longer president" datetime="January 20, 2009"><p>Thus, President George W. Bush is the 43<sup>rd</sup> <em>President</em>, but only the 42<sup>nd</sup> <em>person</em> to hold that post.</p></del>
<ins cite="B. H. Obama is now president" datetime="January 20, 2009"><p>Thus, President Barack H. Obama is the 44<sup>th</sup> <em>President</em>, but only the 43<sup>rd</sup> <em>person</em> to hold that post.</p></ins>
The result is identical to the example in Block Elements:
Now in the above examples, I specified ancestors by element name, but you can also specify them by attributes, class, ID, pseudo-class, or any combination of the above as seen in the Mix And Match
section. The only thing you can't use to specify ancestors, parents or siblings is a pseudo-element.
For example, in the stylesheet for this book, the first letter of the first paragraph of the chapter is large, and the text of the first paragraph flowed around it. But I didn't want the content of any following elements to be affected by it. So how do I select the next element?
div.chap_intro > p:first-child + *
This means Start with a div element with the class value of chap_intro
, then find a child element that is a p element and the first child, then find the following sibling of that p element, whatsoever that sibling element might be.
- div.chap_intro
- div
- Start with a
div element
- .chap_intro
- with the
class value of chap_intro
,
- >
- then find a child element
- p:first-child
- p
- that is a
p element
- :first-child
- and the first child,
- +
- then find the following sibling of that
p element,
- *
- whatsoever that sibling element might be.
If you've been using the JavaScript tools that I told you about back in the Prologue, you're likely to have seen some fairly complicated selectors. With what you've read in this chapter, you can now follow them and see just how those selectors work to pick out a specific element.
Tables And Nesting
Tables are handled strangely in HTML: Browsers assume that every table element has a tbody element nested within, and all tr elements are children of tbody unless they are explicitely nested within thead or tfoot. This has far more effect on scripting, which is why I mention it again in The Document Object Model and DOM Manipulation. I explain why things are this way in Coding Shortcuts And Other Things.
XHTML—when read as an XML-based language—does not have this quirk. As with any element in an XML document, if the tags aren't there, neither is the element.
Multiple Selectors
As each selector can have, at most, one rule (although you could have the same selector several times), a rule can have more than one selector. The symbol used to create a group of selectors is a comma, which tells the bowser to expect another selector.
For example, if you wanted all header elements to be centered, using one selector for each rule would look like this:
h1{text-align:center;}
h2{text-align:center;}
h3{text-align:center;}
h4{text-align:center;}
h5{text-align:center;}
h6{text-align:center;}
To save space and typing, you could also rewrite the above in this fashion:
h1, h2, h3, h4, h5, h6{text-align:center;}
You can join any number and any kind of selectors in this manner (my custom pagination stylesheet has a rule with no less than 257 selectors). Below is the result of adding an internal stylesheet with the above rule to the header elements example from Common Block Elements.
Final Notes
Just a few more things you should know.
One: while selecting elements solely by their name, class, ID, or attributes causes the top-to-bottom hierarchy of a stylesheet to be fairly straight forward, more complex selectors can cause things to get more complicated. So don't hesitate to make selectors more explicit to get the results that you want.
Two: The not() pseudo-class can only handle simple selectors (that is, only a single attribute, class name, identity, etc). Each new exception will need another not()pseudo-class appended to it. For example, if you wanted to select p elements with neither class or title attributes, you would have to write out p:not([class]):not([title]) as the selector. Unfortunately, this does mean you cannot exclude elements by nesting.
Now that you know how selectors work, I can now explain what you can do with them. The next few chapters will be all about CSS properties, their permitted values, and how you can use them.