Demonstrations
I think the best way to do this chapter is to be long on demonstration and short on explanation. I think you know enough about JavaScript that I don't need to reëxplain things. Please understand that I'm not trying to leave you in the dark by giving all this such short shrift. I've spent the last several chapters explaining various parts of JavaScript, so you've seen this all before.
Collapsing Menu
This one is actually quite easy. The style you're going to control is display. The keywords, as mentioned in Arranging The Page, are:
- inline
- inline-block
- block
- none
We're going to use block and none.
We want submenus to be hidden from the start. List items that have a hidden submenu will have a solid disc, those that have a visible submenu will have a circle.
This kind of styling we will have to set through JavaScript, since CSS 2.1 can't style an element according to its children.
First of all, the CSS and the HTML:
The list looks like this:
Before we go any further, there's one thing you have to be aware of. I could have included the following rule in my CSS:
However, if you do the CSS this way and the viewer has JavaScript turned off (and many of them do), there will be no way for the viewer to view the submenus. If I hide them through JavaScript, then if someone has JavaScript turned off, the submenus are never hidden and thus still useable (this is good practice).
The way I'm going to do hide the submenus through JavaScript is assign a list of li element nodes to a variable. Then I will use some JavaScript to single out li elements that are parent elements of ul elements, give them discs instead of circles for list styles and hide their respective submenus.
What the if statement does is check to see if any li elements have descendant ul elements. If they don't, then the returned node list of ul elements has a length of 0. It is unwise to use if((menu_items[l].getElementsByTagName("ul").length) == 1){}ul elements.
So, now we have this:
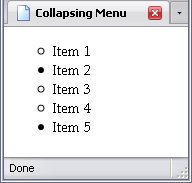
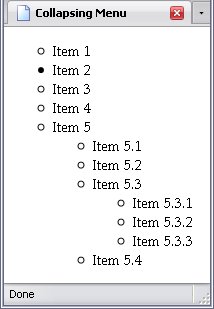
Comparing the two pictures of the lists, you can tell that those with sublists are now the ones with discs. Now, to create a command that will make the submenus appear and change their list styles to a circle:
Stating that only the first ul element will be displayed keeps the sub-submenus from being displayed as well.
Now to assign click events. We've got the loop already; let's use it.
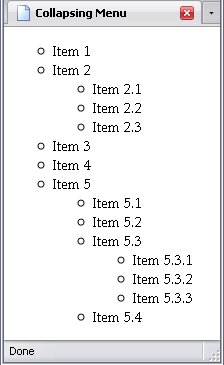
Now only li elements with descendant ul elements will get the click events. Below, I've expanded the submenu and sub-submenu of Item 5, but not the submenu of Item 2.
But what if I wanted to hide them again? I could, of course, expand the click event with an if/else statement:
This would work perfectly well—except for one problem: Item 5.3 has a submenu of its own, and expanding that will cause submenu 5 to collapse. And what if the items contained links? Suddenly JavaScript gets tricky. You see, when you click on a child element of a list item, you're clicking on the list item as well.
Adding Another Mouse Event
You could add a special element that would allow a precise element to be clicked on. But possibly the easiest way to keep this from happening is to assign a different mouse event to close it—let's use ondblclick:
The final script looks like this:
This does have the disadvantage of hiding the entire submenu of Item 5 when the submenu of Item 5.3 is double-clicked. Otherwise, this works pretty well.
Adding A Special Element
If you wanted to add a special element to the list (say, button), you could assign the click event, which means you click on that element, rather than on the entire li element itself:
Because the button will let us know there's a submenu, I'm going to get rid of the list styling trick altogether. To save some typing, I'm also going to assign a few properties to the list items containing unordered lists that normally aren't there.
var menu_items = document.getElementById("Menu").getElementsByTagName("li");for(var l = 0; l < menu_items.length; l++){if((menu_items[l].getElementsByTagName("button").length) > 0){Clicker = menu_items[l].getElementsByTagName("button")[0];SubMenu = menu_items[l].getElementsByTagName("ul")[0];SubMenu.style.display = menu_items[l].getElementsByTagName("none")[0];Clicker.onclick = function(l){return function(){if(menu_items[l].Clicker.firstChild.data == "+"){SubMenu.style.display = "block";Clicker.firstChild.data = "-";else {SubMenu.style.display = "none";Clicker.firstChild.data = "+";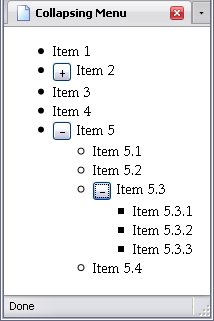
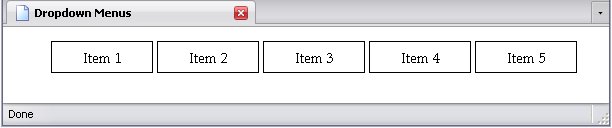
Dropdown Menus
The problem of clicks doesn't often occur in dropdown menus, because they normally use completely different mouse events: onmouseover and onmouseout. So here's a menu:
The HTML for this list is identical to the our previous menu, but the style sheet is quite different:
Yes, I know I automatically hide the submenus here. If this were a list of links, I'd have the submenus on the main items' respective pages.
The JavaScript code is nearly identical to the collapsing menu without the buttons as well, except for a few, minor adjustments:
- most of the JavaScript for list styling is gone (we don't need it anymore),
onclickis replaced withonmouseover,ondblclickis replaced withonmouseout.
And it's, well, as simple as that:

The only difference between a dropdown menu and a flyout menu is the orientation of the main menu, really.
Tabbed Menus
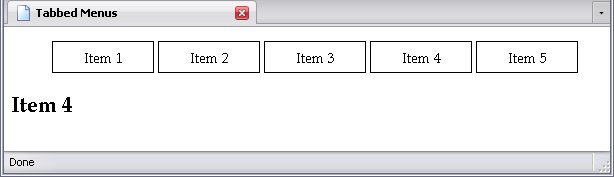
Tabbed menus are a little more complex because they have to both hide one element and display another at the same time. So either you have to let your script know which element is showing, or hide all relevant elements before showing the one you want to display (I'll use the first method). Beyond that, it's the same old story all over again.
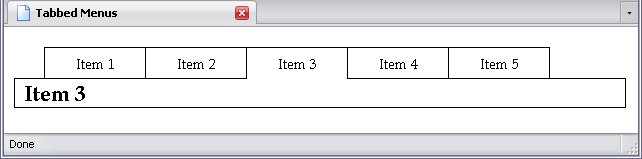
Below is the menu in question and the content it controls:
And below is a script that:
- creates an array of
lielements in #Menu, - creates an array of
h2elements, - creates a tracking variable,
- assigns click events,
- hides all
h2elements, - and lastly displays the first
h2element.
We want this event to do three things:
- Display the selected
h2element - Hide the rest
- Keep the variable cur updated.
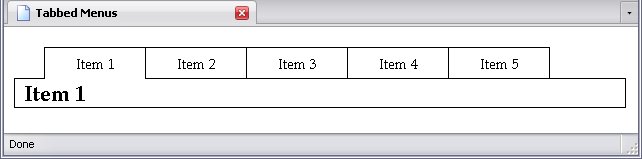
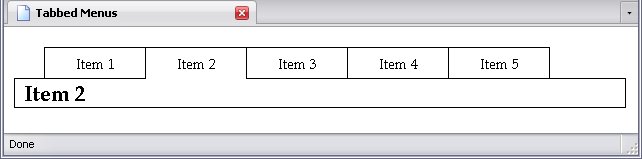
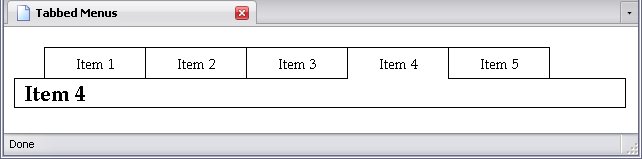
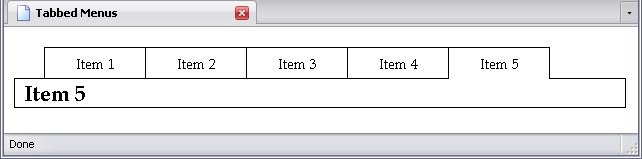
Below, I have clicked on each tab in turn:


The Illusion of Tabs
I know a lot of tabbed menus look like real tabs, the current one being on top. This is quite simply an optical illusion created by border manipulation. Let me show you what I mean. First, we have a style sheet that defines that all elements here are absolutely positioned. The property z-index is a one that says This layer is on top of that one
. The menu has a z-index of 2, which places it on top of the h2 elements, which have a z-index of 1. No, I haven't mentioned that property before. The z-index properties are in bold.
Furthermore, the li elements have a background of opaque white and no bottom border. This will become very important very soon.
Because of the way this is styled, I set the id attributes of the li elements (the IDs are shown in red in the style sheet).
You might be noticing right now that a lot of successful JavaScript requires planning ahead when you're creating the (X)HTML and the CSS, or at least tinkering with those. Planning ahead is a good thing, and tinkering is often necessary.
The script is nearly identical, but take a look at what's been added.
Six lines in total have been added:
- three lines, adjusting the height of two specific
liitems by a single pixel, either extending (and thus overlapping and hiding) or retracting (and thus revealing) the top border of theh2element that is showing; - three lines that set the positioning of the
h2elements.
Abracadabra.
You may wonder why I used JavaScript to absolutely position the h2 elements instead of CSS and why I bothered with giving the body element padding on top. The answer is simple: absolutely positioned elements can overlap other elements. So if someone had JavaScript turned off and I'd used CSS for the positioning, they'd see a mess of overlapping text. But with what I did, a viewer looking at my webpage would see this:

Certainly not as slick-looking as when JavaScript is turned on, but it's readable, and that is the point.