Assigning An Event
In JavaScript Objects, you'll remember that we could assign methods to properties (I even demonstrated how to assign a method directly without giving it a name). We do the same thing with events: the procedures we create and assign to events become methods of that particular element node object.
Before we assign an event, let's set up a procedure for that event to work with. This procedure will decide whether or not the value we send to it is greater than, less than, or equal to 5, or if it's a number at all.
function Write(num){var text = "The value is ";if(isNaN(num)){"not a number.";else {if(num < 5){"less than ";else if(num > 5){"greater than ";else {"equal to ";"5.";document.getElementById("Answer").firstChild.data = text;I've also created a page to use this:
The blue square is a div element to which I've assigned four different events. Using events as attributes, the code for this element looks like this:
As you can see, the values of the event attributes are all procedure calls. However, it's almost as easy to assign them through JavaScript. To select which element to assign these, we use the method getElementById to get the div element with unique identity Events; we may as well use that ID for scripting, since we're already using that ID for styling purposes:
Now let's use it for scripting as well:
var events = document.getElementById("Events");onmouseover = function(){Write("Something else");}onclick = function(){Write(4);}ondblclick = function(){Write(6);}onmouseout = function(){Write(5);}You can see that this gets more complicated when I assign them through JavaScript. When I used the attributes, I didn't have the word function in there, nor the extra braces, so why don't I have something like events.? Feel free to try that, but I'll tell you right now that this will make that procedure run automatically; you're calling the procedure by assigning it.onmouseover = Write("Something else");
As I said earlier, what we are doing here is making these mouse events methods. These methods contain calls to the functions we wish to use, so the function call will not be triggered until the method assigned to the mouse event is triggered. Sounds complicated, I know, but that's the best I can describe it.
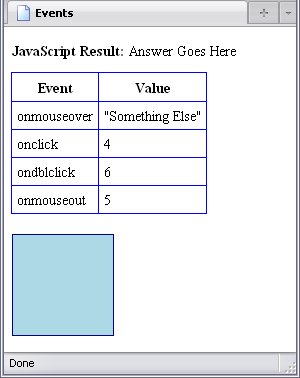
Below are the results of the script. The text Write returns appears at the top of the page in each screenshot, right beside JavaScript Result:
.
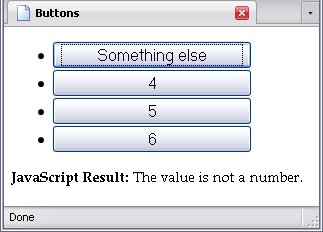
- By moving my cursor over the blue square (
onmouseover):Write("Something else"); -
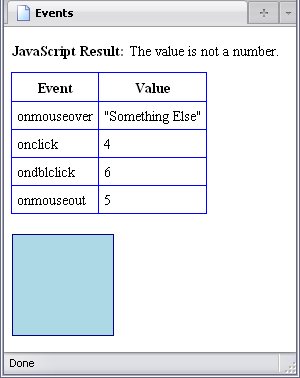
onmouseoversends the valueSomething Else
toWrite. AS the string cannot be converted into a number, the result isThe value is not a number.
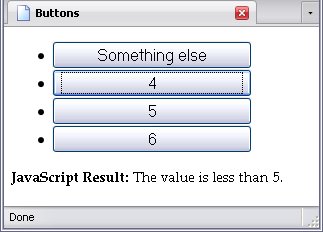
- By clicking on the blue square (
onclick):Write(4); -

onclicksends the value4
toWrite, and the returned text isThe value is less than 5.
- By double-clicking on the blue square (
ondblclick):Write(6); -
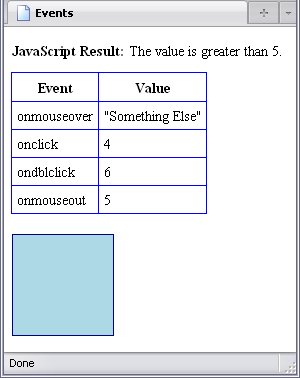
ondblclicksends the value6
toWrite, and the returned text isThe value is more than 5.
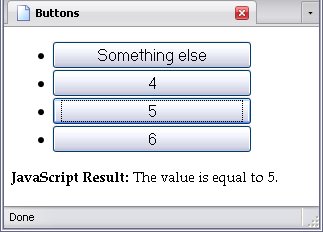
- By moving the cursor off the blue square (
onmouseout):Write(5); -
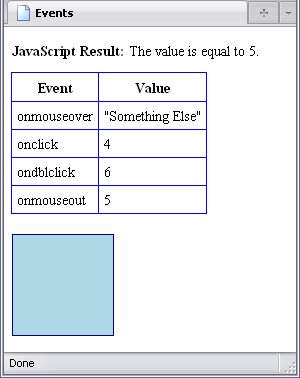
onmouseoutsends the value5
toWrite, and the returned text isThe value is equal to 5.
It is really that straightforward. You can have as much code as you please in the assigned click event. You could even get rid of Write and assign its code to each event:
Write Functionvar events = document.getElementById("Events");var text = "The value is ";var num;onmouseover = function(){"Something else";if(isNaN(num)){"not a number.";else {if(num < 5){"less than ";else if(num > 5){"greater than ";else {"equal to ";"5.";document.getElementById("Answer").firstChild.data = text;onclick = function(){if(isNaN(num)){"not a number.";else {if(num < 5){"less than ";else if(num > 5){"greater than ";else {"equal to ";"5.";document.getElementById("Answer").firstChild.data = text;ondblclick = function(){if(isNaN(num)){"not a number.";else {if(num < 5){"less than ";else if(num > 5){"greater than ";else {"equal to ";"5.";document.getElementById("Answer").firstChild.data = text;onmouseout = function(){if(isNaN(num)){"not a number.";else {if(num < 5){"less than ";else if(num > 5){"greater than ";else {"equal to ";"5.";document.getElementById("Answer").firstChild.data = text;The above neatly demonstrates two things:
- Why procedures are so important in the first place.
- In the above case, I repeated the same block of code four times. Using a procedure for all of these drastically reduces the amount of coding I need to create and edit.
- Why assigning click events through JavaScript is better than assigning them through attributes.
- It is perfectly fine to skip the step of calling a procedure as I did in the above example if one or more of your click events has its own unique coding. If
onmouseoverhad some string-based operations unique to that event, theWritefunction would be useless, and I could assign coding directly to theonmouseoverevent. Because of the very nature of JavaScript programming, doing that theonmouseoverattribute would be either very difficult or downright impossible.
Assigning Through A Loop
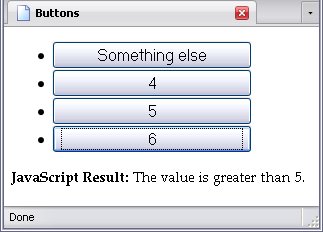
The function Write is remaining exactly the same, but the code that assigns events is changing. This time, I'm assigning click events to the following list of buttons:
I could assign click events one by one to these buttons:
var buttons = document.getElementById("Buttons").getElementsByTagName("button");onclick = function(){Write("Something else");}onclick = function(){Write(4);}onclick = function(){Write(6);}onclick = function(){Write(5);}But this gets to be a pain in the butt, especially if I'm using something like this on multple pages with different numbers of buttons. So either I'll need a drink to cure such a headache, or I need a loop.
Actually, why choose between the two? Excuse me.
The first adjustment to the above code is to have it get the information from the button text for each button:
var buttons = document.getElementById("Buttons").getElementsByTagName("button");onclick = function(){buttons[0].firstChild.data}onclick = function(){buttons[1].firstChild.data}onclick = function(){buttons[2].firstChild.data}onclick = function(){buttons[3].firstChild.data}Now we are ready for a loop. The loop we will use is a for loop, since buttons is a node list.
var buttons = document.getElementById("Buttons").getElementsByTagName("button");for(var l = 0; l < buttons.length; l++){When you use a loop, you can't simply assign a method as we've done earlier. It's a bit more complicated than that. You have to assign a new method for every iteration of the loop. You accomplish that by returning
a method containing a call to the function you ultimately want to trigger. In other words, function(){Write()}function(){return function(){ Write())}()
after the first function keyword? That's where the variable containing that value goes. You also have to use that variable at the end of the assignment as well, again in parentheses: function(l){return function(){ Write())}(l);
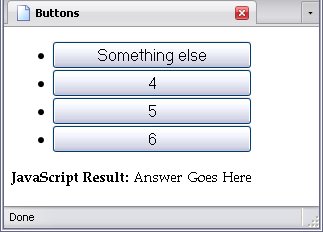
onclick Events Assigned Through A Loopvar buttons = document.getElementById("Buttons").getElementsByTagName("button");for(var l = 0; l < buttons.length; l++){onclick = function(l){return function(){buttons[l].firstChild.data}}(l);Below are five images, the first displaying the page in its original state, the rest showing each button (which is automatically highlighted) being pressed in turn:
Looks complicated, but then again, JavaScript usually is (and other programming languages aren't much better).
This can even be used for nested loops. For example, if I were to assign click events to a table of buttons (I'll give the table the ID of Buttons
), I would do it like this:
var trs = document.getElementById("Buttons").getElementsByTagName("tr");var buttons = new Array();for(var l = 0; l < trs.length; l++){getElementsByTagName("button");for(var l2 = 0; l2 < buttons.length; l2++){onclick = function(l, l2){return function(){buttons[l][l2].firstChild.data}}(l, l2);On the first two lines, I create two arrays: a node list of tr elements named trs, and the array called buttons, which is created as a new array. We'll be assigning values to it shortly.
In the outer loop, I assign a node list of button elements contained in each tr element. In the inner loop, I use a loop to assign the click events.
Notice that with nested loops, the actual assignment of an event isn't any more complicated than through a single loop save for the fact that two variables are passed in this case, and in the end pair of parentheses those same variables have to be in the same order that they are in the first pair: (function(l, l2){ . . . }(l, l2);
Below is an example of the resultant page:

And when the user uses this webpage, it all looks so completely normal, no matter how loopy things are behind the scenes.
Assigning Through An Object Template
On occasion, a click event needs a great deal of information from the element that the event is assigned to, or the event groups several elements together. One way to keep this all straight is to assign the click event through an object, which will contain the necessary information.
I assign click events in such a manner in one example page of my book: the page that demonstrates subpatterns in a regex. Because that example uses concepts I haven't explained yet (in particular, concepts explained in Manipulating The DOM), I altered an example shown in Functions And Methods—specifically, P_Full_Text, used throughout that chapter.
I made it into the object template P_Info. Each p element node has its own instance of P_Info assigned to the property OnClickScript; assigning element-specific objects to new properties of the element nodes they refer to is something I often do to keep code from tripping over itself.
Below is the object itself:
P_Info Object Templatefunction P_Info(el){var p_child = el.childNodes;var show = "Node_Count";var txt = document.getElementById("td_" + el.getAttribute("id").substr(2)).firstChild;var p_text = "";for(var loop = 0; loop < p_child.length; loop++){nodeType == 3)?(p_child[loop].data):(p_child[loop].firstChild.data);onclick = function(){data = (show == "Node_Count")?p_text:p_child.length;"Node_Count")?"El_Text":"Node_Count";There is something very important that is you should notice: this is not here. That is no mistake; I do not need to get any information or use any functions in this object; I just need it to assign a click event to whatever element is passed to the template through el.
P_Info Object Templatevar pars = document.getElementsByTagName("p");var i = 0; i < pars.length; i++){OnClickScript = new P_Info(pars[i]);In this case, it's p elements, which means that the onclick event in the template is assigned to them.
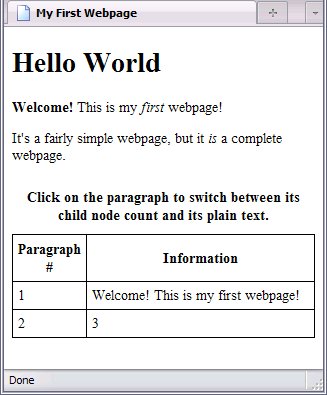
In the above page, the first paragraph has been clicked on and the second has not, so they display different information.
I have assigned events through objects several times. Certainly, objects came in handy in one very large page that set up a schedule for a fantasy basketball league: each tr element (which corresponded to a date) was assigned an object, and the inner workings of the object's template assigned onchange events to select elements—24 per row!—along with loads of crosschecking within that row to make sure that a game could take place on that date. Doing it without objects would have been difficult at best. That was the same template as the one I mentioned having been used more than 200 times in JavaScript Objects.