Frames
HTML 4.0 (the predecessor of 4.01) introduced something called frames, which split the browser's viewport up into different sections, each displaying a different, complete webpage. Frames were usually used when one of those webpages displayed something that was used in each page, such as navigation. It was a good idea in concept, but the execution left a few things to be desired. Amongst the litany of woes:
- Using the back button on a browser in frames tended to be unpredictable, depending on what frame was loaded when.
- You could not bookmark a specific set of pages in the frameset's, only the default set (JavaScript did provide a way around that).
- Accessibility for the disabled was severely compromised.
- Printing frames could also wasteful, as you might find yourself printing all pages displayed in the browser.
- Viewers would have to download multiple pages: the page defining the frames, and all pages displayed by the frames.
- Not all browsers during frames' heyday supported frames, so you had to code a no-frames version of your webpage.
Server-side scripting—explained in Server-Side Scripting—allows for frequently-used code to be placed in its own file but made part of the webpage proper, rather than displayed apart from it.
So why were frames ever used?
- In many cases (such as website hosts at the time and websites that come on a CD, like this one), server-side scripting simply isn't available.
- Frames allowed each page they displayed to scroll seperately (handy in the case of very long navigation lists).
- They were a means of arranging a page before CSS really came into its own.
- Server-side scripting usually requires a website creator to learn a new language (they're listed in that chapter). Frames do not; they are HTML.
For this reason, framesets did see a heyday and are still used, so I will tell you about them.
Just a note here: So far as I can tell, frames only ever worked for HTML pages—although there was an XHTML 1.0 Doctype for frames, they don't seem to work when the file is treated like XHTML.
The Structure Of A Frames Page
First off, Frameset (X)HTML has its own Doctype:
<!DOCTYPE html PUBLIC "-//W3C//DTD HTML 4.01 Frameset//EN" "http://www.w3.org/TR/html4/frameset.dtd">
<!DOCTYPE html PUBLIC "-//W3C//DTD XHTML 1.0 Frameset//EN" "http://www.w3.org/TR/xhtml1/DTD/xhtml1-frameset.dtd">
Webpages using Strict and Transitional (X)HTML have the following structure within the html element:
Framesets worked a tad differently:
- Head
- Root frame set element
- frame elements
- Other frame set elements
- The no frames element
The head worked as normal, a frameset arranged frames into columns and rows, frames contained references to the pages they were to display, and the last was an element that would act in lieu of a body element if the browser didn't support frames.
The Elements Of A Frames Page
The frameset uses three elements used nowhere else in HTML:
The Frame Set Element
Element Name: frameset
The frameset element was used to arrange frames in the browser viewport. Framesets could be nested as needed.
Implied Attributes
- rows
- cols
- You're only supposed to use one of these two attributes—that is either
rows or cols; I'm not sure what would happen if you tried to use both. The only difference between these two attributes is cols splits the screen into vertically arranged sections; rows splits the screen into horizontally-arranged sections. They contain a comma-separated list of lengths, either as pixels or percentages, and the default is 100% (one row or column). You can also use an asterisk (*
), which means whatever is left.
If you have two lengths expressed with an asterisk, you can place a number before each one to determine the ration of remaining space each should get. Some examples:
- 50%,50%
- 50%,*
- 1*,1*
- The screen is split in half.
- 1*,2*
- The left or top would take up ⅓ of the screen, the right or bottom would take up ⅔.
- 150,*
- The left or top would take up 150 pixels of the screen; the right or bottom would take up the rest.
- *,150
- The right or bottom would take up 150 pixels of the screen; the left or top would take up the rest.
- onload
- All the frames have loaded
- onunload
- All frames have been removed
Forbidden Attributes
All usual event and language attributes are forbidden to this element.
The Frame Element
Element Name: frame
The frame element is what refers to the page or file that's supposed to be included.
The frame element is an empty element. It has no end tag.
Implied Attributes
- src
- The URI of the page this refers to
- name
- This gives the frame a name for link targeting. (More on that later).
- frameborder
- This can have two values:
1
(if you want a frame border) or 0
(if you don't). The default value is 1
.
- marginwidth
- marginheight
- This sets the margin width and height of each frame, and is measured in pixels.
- noresize
- This has only the value of
noresize
, and is used when you don't want your users to resize the frames (which they normally can do by dragging the borders).
- scrolling
- This allows you to set whether or not a page has a scrollbar. It has three values:
yes
, which means that there's always a scrollbar present; no
, which means that the frame can't be scrolled; and auto
, which means that the scrollbar appears when required. The default value is auto
.
Forbidden Attributes
All usual event and language attributes are forbidden to this element.
Targetting A Frame
You can set a hyperlink to target a frame in a frameset using an attribute found only in the Transitional Doctype: target. This attribute could be used in the following elements:
These elements would not be used in the frames page itself, but rather the subpages it displayed. The base element allowed for a default target to be set for all links on that page. Conversely, the target attribute apparently has no effect on the link element. You can only specify one target per hyperlink.
There are four specially reserved names:
- _blank
- Loads the page into a new window.
- _parent
- Loads the page into the parent frameset (in other words, the frames page itself).
- _self
- Loads the page into the same frame as the linking document.
- _top
- Gets rid of all framesets and loads the page into the original window.
The values for both target and name follow the same rules as id, the exceptions being the special target names mentioned above.
The No Frames Element
Element Name: noframes
Not all browsers in the heyday of frames supported frames, and thus you had the noframes element, which was designed to hold a version of the page that didn't use frames, acting in lieu of a body element. In practice it usually contained a message along the lines of Sorry, your browser doesn't support frames
or wasn't there at all. Nonetheless, that was its purpose, and was usually the last element in the root frameset.
Using Frames
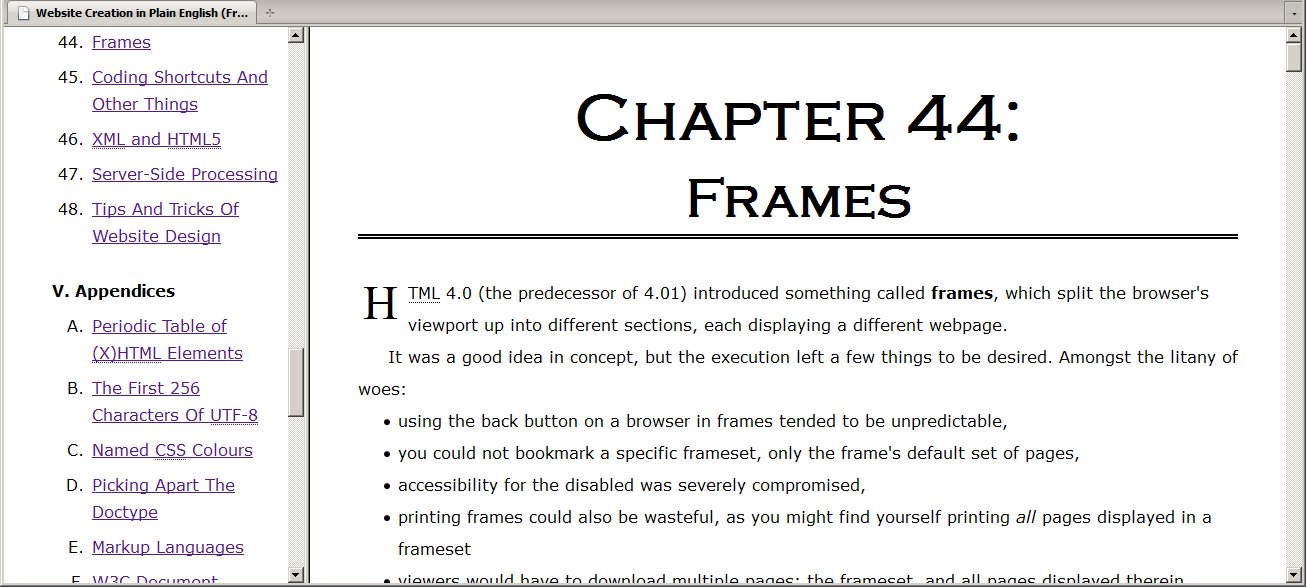
I originally had a fairly basic demonstration of framesets for this book (using nested framesets, explained later in this chapter), but I then realized a better demonstration would be to present this entire book in frames mode. Below is a screenshot of that mode; clicking on it will let you experience frames for yourself.
Below is the code used to create this page. A note on the filepaths: (X)HTML files (framesmode.html and framenav.html) are contained in the folder Frames/, a sibling folder to Chapters/
<!DOCTYPE html PUBLIC "-//W3C//DTD HTML 4.01 Frameset//EN" "http://www.w3.org/TR/html4/frameset.dtd">
<html lang="en-CA">
<head>
</head>
<frameset cols="300, *">
<frame src="./framenav.html">
<frame src="../Chapters/Beginning/Beginning-Prologue.html" name="frame-chap">
<noframes>
<p>You have no frames</p>
<ul>
<li><a href="../Chapters/Other/Other-Frames.html">Return to the Frames chapter.</a></li>
<li><a href="../index.htm">Return to the chapter listing.</a></li>
</ul>
</noframes>
</frameset>
</html>
<!DOCTYPE html PUBLIC "-//W3C//DTD HTML 4.01 Transitional//EN" "http://www.w3.org/TR/html4/loose.dtd">
<html lang="en-US" dir="ltr">
<head>
<meta http-equiv="Content-Type" content="text/html; charset=utf-8">
<meta http-equiv="Content-Style-Type" content="text/css">
<base target="frame-chap" href="../">
<link type="text/css" rel="stylesheet" href="./Formatting/index.css">
<title>Website Creation in Plain English</title>
<style type="text/css">
ul, ol{
margin-left:0;
padding-left:2.5em;
}
li{padding-top:0.5em;}
</style>
</head>
In the above code, it is the base element that sets the target the various hyperlinks, but more often a target attribute was applied to each a element.
Nested Framesets
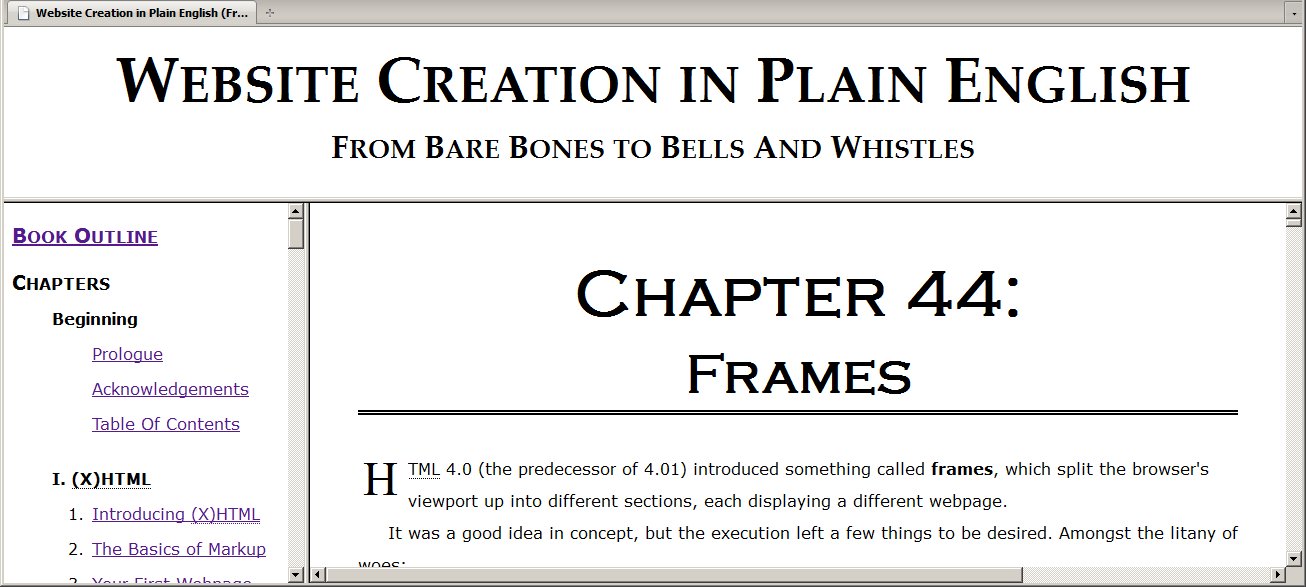
I know I demonstrated only two columns, but three or more columns or rows could be used. Combining columns and rows requires nesting framesets. You can nest them however you like, but if you want a frame to stretch the entire width or height of the screen, place that frame in the outer-most layer of nested framesets. Below, I used nesting to allow myself a horizontal frame that displays the book's title:
<!DOCTYPE html PUBLIC "-//W3C//DTD HTML 4.01 Frameset//EN" "http://www.w3.org/TR/html4/frameset.dtd">
<html lang="en-CA">
<head>
</head>
<frameset rows="170, *">
<frame src="./frametitle.html">
<frameset cols="300, *">
<frame src="./framenav.html">
<frame src="../Chapters/Beginning/Beginning-Prologue.html" name="frame-chap">
</frameset>
<noframes>
<p>You have no frames</p>
<ul>
<li><a href="../Chapters/Other/Other-Frames.html">Return to the Frames chapter.</a></li>
<li><a href="../index.htm">Return to the chapter listing.</a></li>
</ul>
</noframes>
</frameset>
</html>
You can see the results below:
You can also see the frame that shows the actual chapter dramatically shrinking.
As I said earlier, the target attribute can only affect one frame at a time—for the most part, that's all that was needed (JavaScript allowed you to change more than one frame at a time). Again, clicking on the picture above allows you to browse the entire book in this particular mode.
The Inline Frame Element
Element Name: iframe
While not actually part of Frameset (X)HTML (it's part of Transitional (X)HTML), the iframe element has a similar purpose, but different rendering. Instead of splitting up the browser's viewport, it creates a smaller viewport
containing the page.
It is not an empty element; besides referring to another page, it may also contain content to be displayed in case the inline frame wasn't supported by the browser.
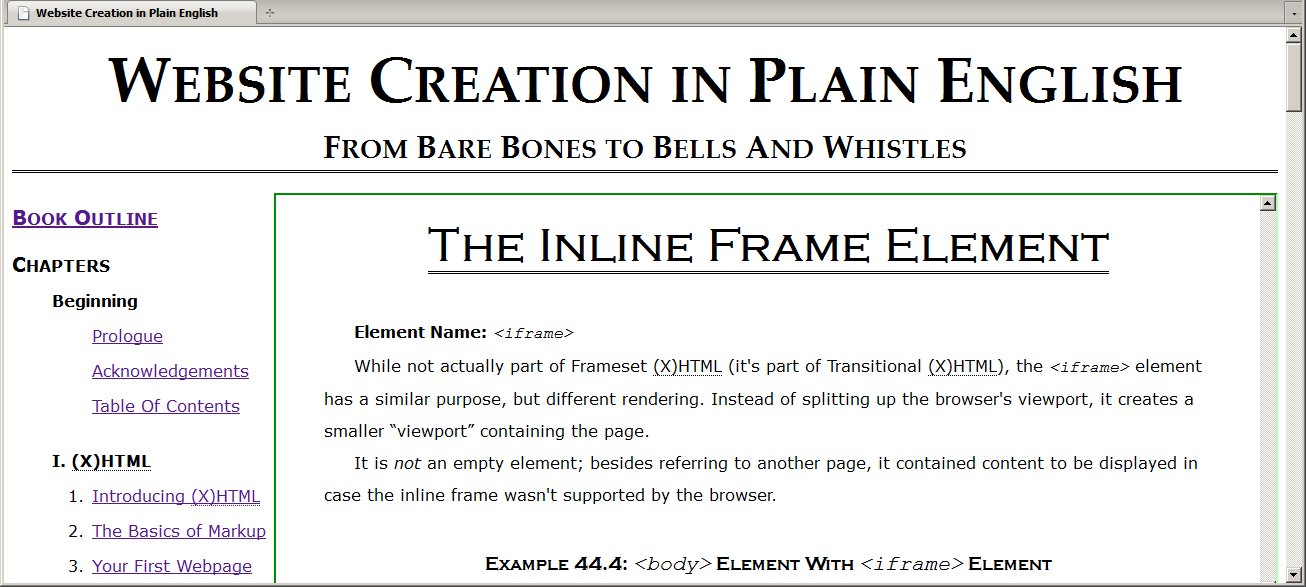
For the example below, I made a copy of the main page of this book and added an iframe element to display the chapters of the book. As with the previous examples, clicking on the picture will allow you to browse the book in that page.
<div id="Header">
<h1>Website Creation in Plain English</h1>
<h2>From Bare Bones to Bells And Whistles</h2>
</div>
<iframe name="show-chap" id="ShowChap" src="../Chapters/Beginning/Beginning-Prologue.html"><p>If you see this message, <a href="../index.htm">Go back to the main index</a></p></iframe>
The inline frame here is bordered in green. Again, I used a base element to set a general target attribute (in this case, to show-chap
).
Implied Attributes
- name
- src
- frameborder
- marginwidth
- marginheight
- scrolling
- Exactly like the
frame element.
- align
- Aligns the
iframe element vertically and horizontally. Its values are:
- top
- bottom
- middle
- left
- right
- height
- Set the height of the
iframe element in pixels.
- width
- Set the width of the
iframe element in pixels.
Forbidden Attributes
The iframe element does not use language or event attributes.


