Your First Webpage
Now that the basics of markup documents have been explained, it's time to focus on the language designed for webpages: (eXtensible) Hypertext Markup Language, or (X)HTML. I'm going to explain the following:
- The HTML Doctype
- Eight basic elements:
- html
- head
- title
- body
- h1
- p
- strong
- em
These were previously mentioned in The Basics Of Markup
- How to use the above to create a functioning webpage.
I'll mention a coding habit of mine right now: I always write tag names in lower-case. When it comes to HTML element names, case does not matter, and many developers use upper-case. In XHTML, all tag names must be lower-case. This is because XML is case-sensitive, which means capital letters are treated as being distinct from lower-case letters.
Starting Off
To reiterate what I said in Introducing (X)HTML, an (X)HTML document and a webpage aren't quite the same thing: the webpage is what you see in the browser and the document is what you work on in a text editor.
If you are creating a document/webpage as you are reading this, you should start with a completely blank text file, except with the extension changed to that of an HTML document. These extensions are .html
and .htm
. By the way, .htm
is an extension that took into account Microsoft DOS's inability to handle a file extension over 3 letters, so there is no difference between the two extensions aside from spelling. An example of such a file name would be index.html.
You could, if you wished, open this blank file in a browser such as Internet Explorer or Firefox, but it would be entirely blank.
An important note here: it doesn't matter if you use HTML or XHTML to write the document; if it's saved with either .html
or .htm
, it's an HTML document. This is deliberate—XHTML was designed that way so that it could be read as HTML (I mentioned this in An Introduction To The Website)
If you wanted to create an XHTML document, you would use one of these extensions:
- .xhtml
- .xht
- .xml
The first two are specifically for XHTML files, while the third is for any XML document. It should be mentioned that while you can use XHTML to write an HTML document, the reverse is not true—HTML is not an XML-derived language, and that will cause problems. More on that later.
This chapter does not cover everything you need to know to create an XHTML document and I won't get to that information until we get to Attributes. Without that information, the browser will not display the page properly. Even if that information was available, Internet Explorer—still the most popular browser in the world—wouldn't read those documents correctly anyways, as it does not support XHTML.
For this reason, I will go through creating this page as an HTML 4.01 Strict document.
The HTML Doctype
The current gold standard for HTML documents is HTML 4.01 Strict. What that essentially means is it's the tweaked release of the 4th version of HTML and allows no elements intended to be phased out of use. Again, the doctype for this is <!DOCTYPE html PUBLIC "-//W3C//DTD HTML 4.01//EN" "http://www.w3.org/TR/html4/strict.dtd">
As I said earlier, this goes at the very top of the document.
An HTML document with just the doctype should thus look like this in the editor:
<!DOCTYPE html PUBLIC "-//W3C//DTD HTML 4.01//EN" "http://www.w3.org/TR/html4/strict.dtd">
Eight Basic Elements
While there are more than 70 possible elements in (X)HTML, the eight I mentioned are perhaps the most common and representative of most other elements.
The (X)HTML Root Element
Element Name: html
<!DOCTYPE html PUBLIC "-//W3C//DTD HTML 4.01//EN" "http://www.w3.org/TR/html4/strict.dtd">
<html>
</html>
The html element is the root element of the (X)HTML document and, like all root elements, contains all coding for the page except for the doctype and may appear only once.
Note where the Doctype and root element are!
The Head Element
Element Name: head
<!DOCTYPE html PUBLIC "-//W3C//DTD HTML 4.01//EN" "http://www.w3.org/TR/html4/strict.dtd">
<html>
<head>
</head>
</html>
The html element has two (and only two) child elements. The first is the head element which contains information that does not appear in the browser window. There can be one—and only one—head element.
The Title Element
Element Name: title
<!DOCTYPE html PUBLIC "-//W3C//DTD HTML 4.01//EN" "http://www.w3.org/TR/html4/strict.dtd">
<html>
<head>
<title>My First Webpage</title>
</head>
</html>
The title element contains text that shows up in the title bar of the window. It can technically be of any length, but because most title bars will show only so many characters, it is wise to limit how much text goes into them. It is useless to give the title element any child elements, as any tags within the title element will only show up in plain text.
Feel free to try that, though.
The title element must be a child of the head element.
The Body Element
Element Name: body
<!DOCTYPE html PUBLIC "-//W3C//DTD HTML 4.01//EN" "http://www.w3.org/TR/html4/strict.dtd">
<html>
<head>
<title>My First Webpage</title>
</head>
<body>
</body>
</html>
The body element is the sibling of the head element. Like the head element, there can only be one body. The body element contains all the content that is seen in the browser window, though the head may contain stuff that affects that content.
Again, because of their function, html, head, title, and body elements can be used only once in an (X)HTML document. They are the exceptions to the rule: almost all (X)HTML elements may be used as often as you please. (The only other exception is the base element, but I'll get to that one later.)
Also, head must come before body, just like our heads are on top of our bodies—unless, of course, you do a headstand, but this is an (X)HTML document, not an athlete.
Four Common Body Elements
According to the rules of (X)HTML, text to be displayed in the browser must be contained in something other than the body element itself. Besides, without various descendant elements of body, all your text will be displayed as one gigantic wall of text, which is difficult at best to read. As I said earlier, these elements can be used as often as necessary.
There are two major types of elements that go in the body element: block elements and inline elements..
Block Elements
Block elements divide content into separate portions by breaking its flow. An example of such a portion is a header (which I will show how to do in (X)HTML right away.)
The First-Level Header Element
Element Name: h1
Remember when I said that (X)HTML element names were comprised entirely of letters except for 6 exceptions? This is one of those exceptions; its element name has a letter and a number.
The element name h1
stands for Level 1 Header
, and is usually used for the title of a webpage.
Most first programs of various programming languages include the words Hello World
, and I will not flout tradition here.
<!DOCTYPE html PUBLIC "-//W3C//DTD HTML 4.01//EN" "http://www.w3.org/TR/html4/strict.dtd">
<html>
<head>
<title>My First Webpage</title>
</head>
<body>
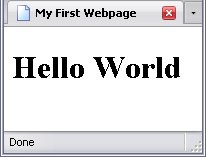
<h1>Hello World</h1>
</body>
</html>
I would like to point out at this time that the above is a complete webpage.
I am not joking; this is technically a complete webpage.
True, there is very little on the page and visually it is very plain, but it is a complete webpage just as "I am" or "I do" are complete—albeit very short—English sentences. If you've been typing the code as you've been reading, you can now view this page. It will look something like this:
The Paragraph Element.
Element Name: p
The element name p stands for paragraph,
and that is exactly what this element is used for. This is probably the most common block element in (X)HTML. While the h1 element causes its text to appear larger than normal on the screen, the p element displays the text at the default size.
<!DOCTYPE html PUBLIC "-//W3C//DTD HTML 4.01//EN" "http://www.w3.org/TR/html4/strict.dtd">
<html>
<head>
<title>My First Webpage</title>
</head>
<body>
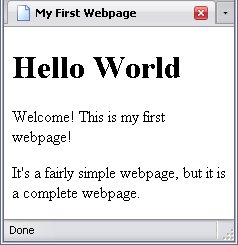
<h1>Hello World</h1>
<p>Welcome! This is my first webpage!</p>
<p>It's a fairly simple webpage, but it is a complete webpage.</p>
</body>
</html>
The result of this webpage is shown below:
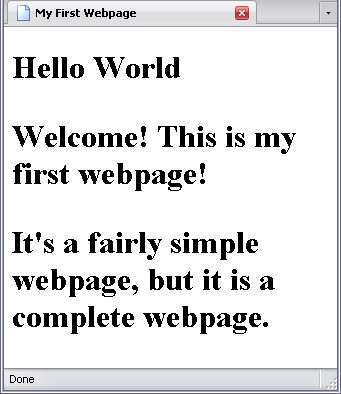
Before we go any further, this would be a good time to point out why one should always use an end tag. Below is the code, missing only the end tag for the h1 element.
<!DOCTYPE html PUBLIC "-//W3C//DTD HTML 4.01//EN" "http://www.w3.org/TR/html4/strict.dtd">
<html>
<head>
<title>My First Webpage</title>
</head>
<body>
<h1>Hello World
<p>Welcome! This is my first webpage!</p>
<p>It's a fairly simple webpage, but it is a complete webpage.</p>
</body>
</html>
Behold the undesirable results:
All the text appears larger than it should because the browser is treating everything like an h1 element, and the text is shown accordingly.
Inline Elements
Not all elements break up the flow of text, and for good reason. If I have a word in italics, I do not want it to appear in an entirely separate paragraph. Nor do I want a keyword shown in bold to be set apart in such a way. I want these words to stay within the flow of text. This is the task of inline elements.
The two most common are the emphasized element (whose opening tag is this: em) and the strong element (with the opening tag strong). These two elements can be used in both the h1 and p elements—with a single caveat on the strong element.
The Emphasize Element.
Element Name: em
The emphasized, or em, element emphasizes a word by putting it into italics. Look how emphasis changes the meaning of Do not steal library books.
Do not steal library books.
Do not steal library books.
Do not steal library books.
Do not steal library books.
Do not steal library books.
Most likely, the first two retain the desired meaning.
Here is the page emphasizing the word "first" in the first paragraph and the word "is" in the second.
<!DOCTYPE html PUBLIC "-//W3C//DTD HTML 4.01//EN" "http://www.w3.org/TR/html4/strict.dtd">
<html>
<head>
<title>My First Webpage</title>
</head>
<body>
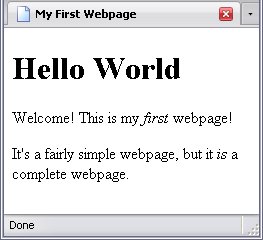
<h1>Hello World</h1>
<p>Welcome! This is my <em>first</em> webpage!</p>
<p>It's a fairly simple webpage, but it <em>is</em> a complete webpage.</p>
</body>
</html>
Here are the results of this webpage:
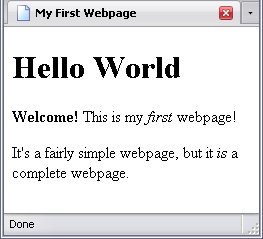
Note the italicized words.
The Strong Element.
Element Name: strong
The second inline element is the strong element, which highlights words by making them bold. This is useful for highlighting keywords. In the code, I will highlight the word Welcome.
<!DOCTYPE html PUBLIC "-//W3C//DTD HTML 4.01//EN" "http://www.w3.org/TR/html4/strict.dtd">
<html>
<head>
<title>My First Webpage</title>
</head>
<body>
<h1>Hello World</h1>
<p><strong>Welcome!</strong> This is my <em>first</em> webpage!</p>
<p>It's a fairly simple webpage, but it <em>is</em> a complete webpage.</p>
</body>
</html>
And the result:
Building Your Webpage
The strong and em elements can contain other strong and em elements (for example, if you want something both bold and italicized, but if you have a strong element nested in another strong element, the strong child will have no effect on the strong parent. The same goes for em elements. Here's the caveat about the strong element I mentioned earlier: since h1 elements are automatically in bold, a strong element will have no effect on them.
Final Notes
In conclusion, the eight elements I showed you will serve for a simple webpage. Now you know:
- how markup itself works,
- the need for a DOCTYPE,
- how the (X)HTML document is arranged,
- eight basic elements,
- how block elements and inline elements work.
The rest—for the most part—will fall in line with what you've learned.
So go ahead, and build your own webpage with just these few elements. You'll find they do just fine for most things. Sometimes other elements are needed, but I'll get to those soon.
Validation
(X)HTML has to follow specific rules, including which elements can go where, which elements are needed, and so on. The World Wide Web Consortium has a program, called a validator, which checks your code to make sure you've followed these rules. Many malfunctioning webpages have errors exposed using this. For example, the missing h1 tag in Example 3.9 would be quickly flagged. The validator can be found at: http://validator.w3.org. Always make sure your page is working properly!
On the Character Encoding Warning
When you validate your webpage, you'll likely see the following warning: No Character Encoding Found! Falling back to UTF-8.
Don't sweat it; I'll tell you how to fix that problem in just a few chapters, when I talk about the rest of the head element's children in Comments, HTML, Head and its Children, Body.