So You Want To Print These Pages
The bad news about printing out these webpages is that the default page breaks and image sizes often leave much to be desired. The good news is this tutorial was originally intended to be printed and to that end, I created some JavaScript-based tools that let me control image sizes, where pagebreaks occurred, and helped me save those changes to a text file.
When I decided to publish this book on CD, I decided that I would show off a bit, polish these tools up (boy, was that good practice in working around browser quirks!), and leave them on for your use.
Do be forewarned: To make sure your changes are what you want them to be, you'll have to use the Print Preview
option of your browser a lot!
Page Breaks
Menu Access: P + click
Since page breaks can happen just about anywhere (in the middle of an image, just after a header, etc), you may wish to change them to something more suitable. To bring up the page break tool, click on any of the following while pressing the P
key:
- Any of the section headers.
- Paragraphs.
- List items (like the ones in this list).
- Definition list terms.
- Table captions.
- Table cells.
- Lines in the coding examples.
- Images.
This will cause the tool to show up on the right side of the screen. The tool itself looks like this:
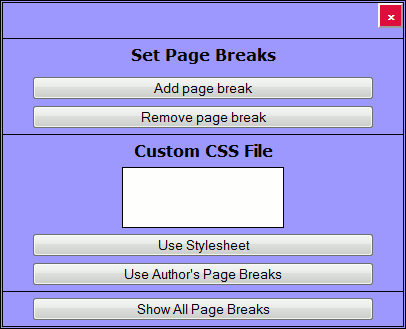
The buttons under Set Page Breaks
are fairly straightforward: the first adds a page break before the element you clicked on, the second removes a page-break you have set. The rest of the menu I will explain soon.
Graphic Sizes
Menu Access: I + click
In this book, several images look fine onscreen, but stretch right off the end of the page. If you click on an image while pressing the I
key, the image size tool shows up, which allows you to resize an image. The default setting is what it's set to on the screen. In the image below, the image the tool is referring to has been scaled down to only 55% of its size. You can see it in The HTML DOM.
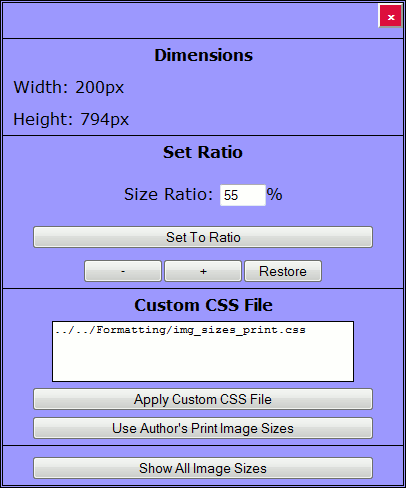
The -
button scales it down 1% (to a minimum of 1% the image's original size), the +
button scales it up 1% (to a maximum of 999% of the original size), and the Restore
button sets the image back to its screen settings (not necessarily its original size).
Saving Your Settings
Since refreshing the page will undo all your changes, I added something that lets you save the settings in a CSS file (it's basically a text file with a .css extension). At the bottom of the menus are buttons that say Show All Page Breaks/Image Sizes
. Pressing this button brings up a textbox with some code in it, as shown below.
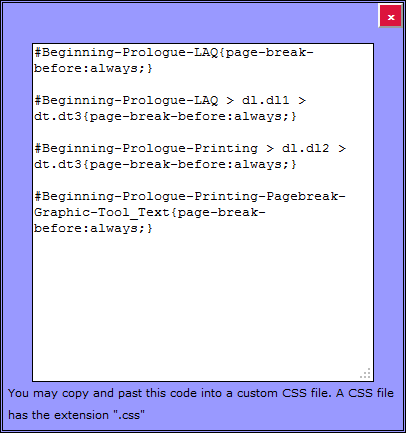
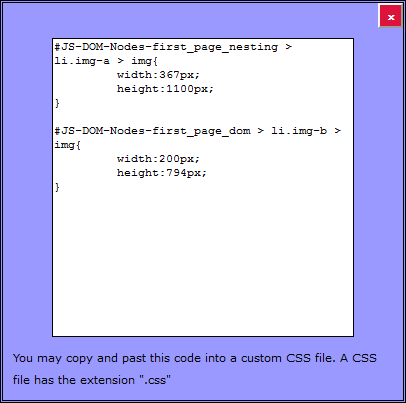
This is actual CSS coding, which I explain in length and detail in Part Two (CSS) of this book. This, you can simply copy into a text file (like one created with NotePad, if you happen to be using Windows). This text file must be saved with the extension .css to be of any use, though.
The way you use this file is simple: in both menus, you see the header Custom CSS File
. You may enter the file name of the .css file you copied the code name into the text box in the menu. Click Apply Custom CSS File
, and your file will be applied to the document (though you may need to use the print preview to see the changes).
Do note, however, one browser may read the path differently than another, and you have to take this into account. For example, if the file stylesheet.css was saved on the C-Drive, various popular browsers would find them thusly:
- Internet Explorer
- C:\stylesheet.css
- Opera
- file://localhost/C:/stylesheet.css
- Firefox
- Google Chrome
- Safari for Windows
- file:///C:/stylesheet.css
Entering in the path and file name of the file you saved the code in will apply that code to your page (so long as it's a .css file). I also have two buttons that say Use Author's Page Breaks/Print Image Sizes
. Those apply the files I created, and they're both on the CD. The file for print image sizes is automatically applied to the webpages here, the file for page breaks is not. For the record, I created my files with the following page setup: 1-inch margins, a header, no footer, portrait orientation. Oh, and I was using FireFox, in case that makes a difference.
A few notes on these tools. If you've copied and pasted some code to this text file, you'll have to physically edit the file if you want to change it later on (again, you can edit it in any text editor). Sorry, but neither tool is able to read those files, and their contents don't show up when you click Show All Image Sizes/Page Breaks
. Also, make sure that, before printing, the tools are closed (that's what the button with the ×
is for), otherwise the tools will show up on the page and possibly block content, as these tools are actually part of the webpage, not merely pop-up dialogue boxes.
Oh, and yes, you can have the code for both image sizes and page breaks in the same file, if you'd like.